These guides should not be reposted off the website. If you translate it, please link back.
– Negative result for LOM
/ Neutral result for LOM
+ Positive result for LOM
Any without one of the symbols above means I don’t know. Some dialogue may be translated from my French account.
Action Points used: 1,200-1,750AP. Due to how personality can change prices, it’s a bit harder to calculate.
Illustrations: 4 – You can earn 2 in a single playthrough– Thomas’ and one of the other three main LIs: Either Roy, Devon, or Amanda. Need to pick the right choice(s).
Expenses: $80 for Outfit (It is 50% off for your first playthrough though, so technically, it’ll be $40)
Special Scene Cost: 15 Gems per special scene.
Outfits: 1
Taki Outfit: Worky Worky

You will automatically find Uncle Archibald when leaving the house to catch the bus during the tutorial. You must pick Well, for now, I’m living with Mom. to get the outfit. He is not guaranteed to show up after the tutorial and may take more tries to get if you don’t get it your first try.
Bonus Items: 3 Furniture Items: You can get whichever Desk you pick as a furniture item for your room. You can technically only get one in a single playthrough, but if you do a replay after unlocking the Jocker system, you can use the rewind one to get the other two options in a replay.
Finally, you can check out my personal playthrough here. Please keep in mind though that my personal playthrough involves me picking the answers that best fit my character– not necessarily the right answers for the most LoM or the illustrations. If you want answers, that is what this guide is for.
The episode kicks off with Candy waking up in her new bedroom. She is just starting at a new job and in the meantime, staying with her mom, Zahra, and sister, Tasha. After some monologuing, make your way down to see your family for breakfast. Your sister is upset because she is being sent off to your father’s place as your mother will be heading to London to open a new museum and she doesn’t want to leave you with the responsibility of taking care of your sister with everything else going on.
Zahra: Do you want something to drink, [name]?
• I’d like a cup of tea, if there’s any. /
• Like you, coffee would be perfect. /
• Orange juice would be good. /
• And you’re saving my life, really. I won’t impose myself for long… /
• And I’ll enjoy it too! My next place of my own probably won’t have a swimming pool… /
• And I’ll be gone when you get back! /
Zahra: Actually, what are your expectations for this fresh start, [Name]?
• [Rebel] I want to get my revenge. /
• [Sweet] Frankly, I just hope that it’ll go better than at EPMC… -5 with Tasha
• [Energetic] I want to succeed in my new job! +5 with Tasha
Zahra: What a horrible experience, he could have turned [Name] off to love forever!
• [Rebel] I’m going to ignore the advice of a sixteen-year-old. -5 with Tasha
• [Energetic] For sure, the next guy who tries to play me isn’t going to get off easy. +5 with Tasha
• [Sweet] Don’t worry about that, Mom. /
After the introduction of Taki, your pet Goose, you then head back to your bedroom to change. There is only the one outfit to choose from. A new feature in New Gen is that your first playthrough of an episode will have the outfits be 50% off.

Head back down after changing for some goodbyes, hugs, and well wishes from your family and then make your way to the bus station by heading out into the Residential Area.
This is where you have a chance to earn an item for Taki. During the tutorial, Uncle Archibald (Aunt Agatha’s replacement) is guaranteed to show up. He is not guaranteed after the tutorial though and you will end up progressing straight to the bus and have to replay the episode otherwise.
Archibald: I didn’t know, however, that you’ve taken up residence here as well…
• Well, for now I’m living with Mom. / ⬅ TAKI OUTFIT OPTION.
• I didn’t really have the choice, to be honest. /
• It’s very recent, I just got here… /
With the conversation done, you make your way onto the Bus to get taken to Amoris where you’ll be let off at a familiar location. As you try to catch your bearings, you get run into and meet the first of the new love interests: Roy.
Roy: I wonder how I didn’t notice you, actually…
• [Sweet] It’s not a big deal, it happens… /
• [Rebel] Is that really your best pick-up line? -5
• [Energetic] No problem, it’s the same for me when I run. +5
After a bit more conversation, make your way to the Shopping District where you’ll find Devenementiel, your new job. After some failed attempts to get into the building, you’ll meet your next LI, Thomas, who if you played High School Life, you may remember as Iris’ younger brother. He’s here to set up your badge so you can enter with no problems in the future.
• [Sweet] You’re not a morning person? Me neither… +5
• [Rebel] And that’s why you’re late? /
• [Energetic] It won’t be dawn for much longer, we shouldn’t dawdle! -5
With more light conversing, you finally enter the building and take a seat over by Thomas’ desk so he can get you all set up.
• [Energetic] It’s crazy, one might almost believe that you don’t like paperwork! /
• [Sweet] I’m sorry you have to do all this for me… -5
• [Rebel] I totally agree: paperwork sucks. +5
Thomas: The quality is good, and you’re facing forward.
• [Rebel] Okay… But we’re going to redo the badge with the photo I brought. -5
• [Sweet] Well… Maybe you could have asked for my opinion before…? /
• [Energetic] Actually, it’s rather funny… I think I’ll get used to it! +5
Thomas: It’s a photo of you, you’re recognizable, and you’re beautiful… No?
• In this case, not really, no. /
• Are you trying to sweeten the pill with flattery? /
• Really, you think so? /
• It’s my mother who’s rich, not me. /
• I’d like you to keep your comments to yourself… /
• Yes, my mother is an architect and is quite well known in the industry… /
• [Sweet] Maybe you could show me around… /
• [Rebel] Never mind. Can I take a little tour myself, to get situated? / ⬅ TOWARDS ILLUSTRATION
• [Energetic] I was hoping you’d introduce me to everyone! /
You can get Devon’s, Amanda’s, or Roy’s illustration in addition to Thomas’ so if you like getting the illustrations or are interested in Thomas in addition to one of the others, don’t be afraid to do his Illustration choices as well here. You also do have another chance to earn his Illustration as well if you prefer one of the other two options, though, it will be at the expense of getting any other illustration then.
If you picked one of the options for Thomas to give you a tour:
He mentions how the place isn’t very big so you shouldn’t get lost. You point out since it isn’t very big, it won’t take long. Thomas agrees with your logic and gives you a speedrun Tour of the office.
First, head to the break area where you will briefly meet Elenda and Brune before being whisked off to the cafeteria next. You’ll then head to the Meeting room. Your final stop will be Devon’s office where after some more conversation, Thomas quickly parts.
At this point, things will kind of match-up in an odd way so I’d recommend just scrolling down past Thomas’ Illustration moment to see how they sync up, so I don’t write it all twice.
If you picked the Towards Illustration Choice:
Out of relief for not giving you a tour, Thomas offers to show you the break area and buy you a welcome drink. Head to the Break Area first for a bit of conversation and then the two of you will automatically move over to the Cafeteria.
• Let me see what there is… / ⬅ TOWARDS ILLUSTRATION
• Nothing, I’m good, thanks…
• Well, what would you like?
If you picked the Towards Illustration choice:
• A tomato soup. It sounds comforting… / ⬅ ILLUSTRATION
• A coffee would be great. / ⬅ ILLUSTRATION
• A hot cocoa, if it’s good. / ⬅ ILLUSTRATION
Yep! All three options work so just pick the one you like best.
During Illustration scenes, you have the option to pay Gems to unlock a special scene that usually has more romantic connotations. You cannot see the scene otherwise, but once you buy it, it’s free permanently.
After some more discussion, Thomas will show you to your desk. If you had chosen the tour, as I mentioned above, Thomas will leave you in Devon’s office and you’d get to the main area, where your desk is, after. If you do his illustration, you do the desk thing first and then go to Devon’s office where he is interrupted by a call. There’s also a few dialogue differences due to that, though, all the dialogue choices are still the same.
With the illustration route, Thomas points out Amanda, your final ‘main’ LI choice, for you while with the Tour route, you assume that is Amanda based on what you’ve heard. Depending on which route you’re on, either you’ll approach her or she’ll approach you– regardless of which happens, the dialogue choice is the same:
Amanda: You must be the new girl. I’m Amanda de Lavienne.
• [Rebel] I take it you must be the old girl? I’m [Name]. /
• [Energetic] Yes! I’m [Name]! Shall we hug? -5
• [Sweet] (I shook her hand, smiling.) +5
Roy will then show up who you may recall from earlier when he ran into you while jogging. After some discussion, both of them will leave, but Roy will then call you over to his Desk to pick out your chair. To make your desk/office space fill a bit more homely/personal, everyone gets to pick their own personal chair.
At the time of writing this, your chair choice does not affect the LoM, but each choice can match to another LI (except for Devon who has his own fancy office and isn’t working out there with the rest of you). Whichever chair you pick will be added to your furniture for you to decorate your room with– all three are under Category 4. You can replay the episode to get the others if you would like to.
• What do you think about this one, in the shape of a dinosaur? Isn’t it too cute?! / (Matches with Roy)
• Look, a real desk chair: mobile, good back support, discreet… / (Matches with Thomas)
• The little round chair is pretty, don’t you think? It’s cute, and it looks comfortable… / (Matches with Amanda)
And for reference, here are each of the chairs (Dinosaur, Regular, Cute round pink) to help with your choice:
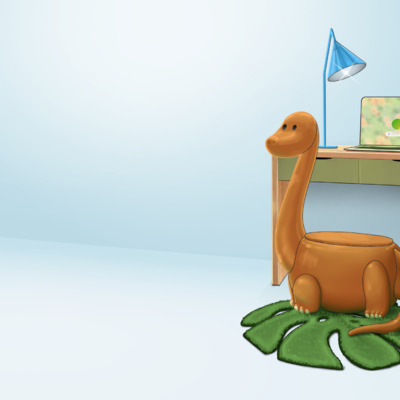
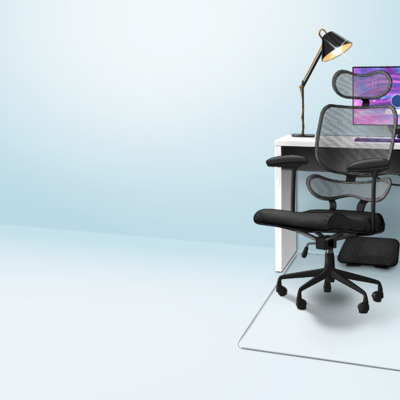
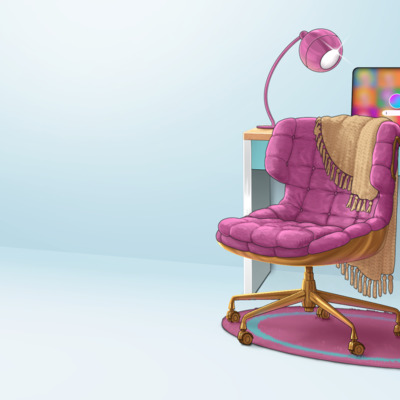
Working Space: Prehistoric Desk | Working Space: Ergonomic Desk | Working Space: Nice Desk
Personally, I don’t think I’d really describe the pink one as ’round’, but it’s what I went for in my story playthrough because it is my favorite color. The Prehistoric is my favorite Dinosaur though so I also did a replay so I could get that one too.
Anyway, after picking your desk, if you went the Thomas Illustration route, Roy will tell you to go see Devon. If you picked the tour route, he’ll just leave you to it.
After seeing Devon, this is essentially where the Tour/Illustration choice with Thomas fully syncs. Once again, Devon will get a phone call and tell you to come back later. Candy leaves and after monologuing about Devon a bit, she’ll say how she has time to kill and that is where we sync up.
Head to the Break Room to meet (or more properly meet for those who picked the tour route) Elenda and Brune. There will be slightly different dialogue at the beginning depending on which options you picked with Thomas (Tour or Illustration), but like with Amanda, the dialogue choices are still the same.
Brune: For us to ask you another three hundred questions?
• [Sweet] Everything’s fine, thanks, and I did find my desk. /
• [Rebel] That only makes three questions for now, I think I can handle that. +5 with Elenda
• [Energetic] It’d be ideal if you could write them all down, that way I can answer them at my own pace. +5 with Brune
Brune: I think we’re better off here, in the end.
• Let’s say that it was… a learning experience. But I wanted to move on to something else. /
• The company in itself was okay… But the people that worked there… +5 with Brune
• I think so too. The mood there was really horrible. +5 with Elenda
After some more discussion, Elenda and Brune are off and now it’s time for you to head back to the main office space to decide who you want to get an illustration of (besides Thomas’ as it was available earlier). Where you go determines who you’ll see, though, you will actually be given a choice to back out and pick a different room if you pick the wrong option.
There is also a separate option if you choose to to back out of every single one.
If you want Amanda’s, go to the meeting room:
Amanda: Can I do something for you?
• Maybe… I’m still getting my bearings… / ⬅ TOWARDS ILLUSTRATION
• Uh… No. I thought the room would be empty… Sorry. -5 (This choice causes you to leave and pick a different option)
Amanda: I come from a very privileged family. I’m not going to disown them after all!
• [Sweet] No, of course not. It’s just that I don’t like to put my life on display. +5
• [Rebel] There’s no shame there, but I don’t really like interrogations. /
• [Energetic] You’re right. I’m not ashamed of it, moreover, on the contrary. -5
If you left and came back after talking to Elenda, it picks up from here:
• (Out of curiousity, I took advantage of the situation to try and read what was on the papers…) /
• (I hurried to help her pick everything up.) / ⬅ ILLUSTRATION
• (I didn’t move. Tough luck for the queen bee.) /
If you want Devon’s, go to his office:
Devon will have finally finished his call and lets you know that it’s okay for you to come in.
Devon: Yes, [Name]. You can come in.
• (I walked into the office, he motioned for me to sit down.) +5 ⬅ TOWARDS ILLUSTRATION
• No, that’s nice of you, but I don’t want to bother you… -5 (This choice causes you to leave and pick a different option)
Devon: Maybe you’d like for us to sign your contract? I have it here…
• Great! I was almost expecting to have an interview. /
• Sure! It’s crazy how fast things go! /
Devon: Saying no wasn’t really an option.
• [Energetic] Really?! If that’s why, then I’d prefer to look elsewhere!
• [Sweet] Great… Yet again, it’s my mom who’s done everything. +5
• [Rebel] For sure, otherwise she could have purchased the entire company.
If you left and came back after talking to Elenda, it picks up from here:
Devon: And when you’re done, you can sign…
• [Sweet] It’s fine, I trust you.
• [Rebel] Would it be a problem if I took it home to read?
• [Energetic] (I took a moment to quickly read through the different pages.) / ⬅ ILLUSTRATION
If you want Roy’s, head to the cafeteria:
• Everyone here knows you do… what, exactly? / ⬅ TOWARDS ILLUSTRATION
• Sorry, this is too weird! / (This choice causes you to leave and pick a different option)
• I’m going to go, before I can no longer look away from those abs, so… / (This choice causes you to leave and pick a different option)
If you left and came back after talking to Elenda, it picks up from here:
Roy: Two sets of fifty, I don’t want to wear myself out either…
• [Rebel] Oh yeah, of course! After a run, a hundred push-ups… It’s the bare minimum!
• [Sweet] Okay… I didn’t mean to bother you… I’ll leave you alone. / (This choice causes you to leave and pick a different option)
• [Energetic] In two sets? Lightweight! +5 ⬅ ILLUSTRATION
If you back out of all three:
You can try to go in again or if you head to the break room or outside and back, Elenda will show up in the main room to greet you.
Elenda: We’re all going to a meeting in five minutes, take the time to finish your tour.
• (Finally, I might have the time to go back to Roy, and ask him exactly what he was doing.) ⬅ Goes to Roy’s Illustration Scene
• (Maybe Devon is done with his phone call…) ⬅ Goes to Devon’s Illustration scene
• (Maybe I can still bother Thomas a little bit…) ⬅ Goes to Thomas’ Illustration scene. Only available if you didn’t get his scene earlier.
• (Maybe I should go straight back to the meeting room with Amanda, then.) ⬅ Goes to Amanda’s Illustration scene
They essentially play out just like the above so just scroll back up to see, but it’s an interesting option. If you decided to do Thomas’ here, he also mentions how he has to check some emails and tells you to go on ahead while everyone else has a slightly different reaction on your return. You also will jump ahead in the dialogue.