Table of Contents
Introduction, Tutorial, & Main Menu
Tales of Djungarian Hamster (Also known as Djungarian Story) is a relaxing Hamster Collection/Raising game about you and a Fairy going on a journey to become “Ham Masters”. If you’re wondering why I don’t refer to the game as a Pet Sim, it’s because outside of the fact that you can feed and matchmake/breed the hamsters, there are no other Pet Sim-esque factors. You don’t have worry about them being clean/eating enough, you can only pet them in a minigame, hamsters that are gotten through the Matchmaking system are adults immediately, and your hamsters will always be happy.
If you were hoping for a pet sim, I wouldn’t really recommend the game, but if you just like cute hamsters and don’t care much for the stress of worrying about some virtual pets, then you may enjoy this game more than you’d expect.
The initial Story mode and Tutorial takes about 25 minutes before you’re allowed into free roaming and doing more or less whatever you want. It pretty much just explains the Fairy’s hopes and dreams and gives you a run-down on the way the game works along with the initial controls.
After the introduction, you will get to choose your very first Hamster from 8 different ones. You can press ZR to look at a new cage of 8. These will have no Traits (more on that in Section 3) and be one of the different “Normal” colored hamsters and either a girl or a boy.
Once you pick your Hamster, you can name it with up to 10 characters.
The story will then continue and the first character you will receive help from is Shishou the Duck who wears a Cowboy hat. He will explain all the controls to you and give you Friendship Points (the currency) as a reward for each one. In order of your tasks:
- Move the R Stick all the way up to look around the cage.
- Move the R Stick all the way down.
- Press the L button to zoom all the way in.
- Press the R button to zoom all the way out.
- Move the Cursor/Hand Icon by moving around the L Stick and then press A while hovering over your Hamster to bring up the menu.
- Open the menu again and pick the “Teach me, hamster!” option.
- Watch the cage for 10 seconds. Just stay there not doing anything. The point is to show you that the Heart amount (Friendship Points) will sometimes just go up overtime so if you’re not doing anything, it could be worth just leaving the game up.
- Press ZR to put food in the bowl. You can feed your hamsters roughly every 30 minutes. Each time you feed them, you will get more Friendship Points. Food is completely free so never worry about running out.
- Press + to go to the Other section. This is where you can find more technical settings along with a little guide, the credits, a glossary, and to rewatch the story.
- Press the – button to save. The game has autosaving as well.
That finishes up Shishou’s instructions and you will then get help from a new friend: Miss Polly. Like last time, you will get more Friendship Points as you go along.
- Clear Fluffle Kerfuffle on “Easy”. I’ll go more into the Minigames in the Minigame section, but the goal is to just pet the hamster wherever the largest Heart is.
- Collect 300 Hearts/Friendship Points (yes, sometimes things get multiple names and yes, it is confusing).
- Clear Food Forager on “Easy”. You make a trail of Sunflower Seeds to get your Hamster to the end before time runs out (or before you run out of Sunflower seeds to use).
- Collect 500 FP. While the game recommends playing the games to hit the amount, if you already hit it after playing Food Forager or get it from just sitting around, it’ll complete that way too.
Next you’ll get some help from Hamsterman with the next part of the tutorial.
- Open the menu and go to the Hammy-ham Mall. Buy a Hamster Wheel from the Toys section. It costs 200 FP.
- Open the menu and go to the Cage Creator. The rest all require you to stay in here to learn how to use the Cage Creator. You will be rewarded at the end so don’t feel you need to exit out and back in for each objective. I would recommend not leaving the Cage Creator until you finish this entire part of the tutorial as it can get a bit confusing otherwise.
- Press ZR to open the Item Box and then press B to close it. The Item Box will show you all items you have that are currently not in the cage.
- Now pick the Hamster Wheel from the Toys section by opening the Item Box back up, going to that section, and pressing A on the item. You can move it around with the left stick. Press A wherever you want to place it.
- Hover over the Hamster Wheel and press A again to lift it back up. Press Y to rotate it. Then place it back down wherever.
- Once again, pick back up the Hamster Wheel. This time, press X to put it away.
- Now take the Hamster Wheel back out and place it down again.
We now have help from another new character: Lianne, an idol of the Hamster World.
- Open the menu and pick “Matchmaking”. Press A for Single Player. You can cancel out and go back to change the predictions (I’ll go more into it in the Matchmaking section). Once you’re sure, hit A again. Your Hamster will meet up with one of the three predicted and then a new Hamster has been brought to life and will come with up to 3 traits. You will then be asked to name it.
- Open the menu from your new Hamster. Pick “Tell me, Hamster” and then press X for “Return to the Hamlet” to send them to Hamster Village/Hammy Alley.
- Pick your other Hamster and pick “Hammy Alley”. Press X to open up the list and then press A when highlighted over the name of the Hamster you want to put them back in the cage, as long as you’re not maxed out/still have room.
And that finishes up the Tutorial! You will now be brought into the Cage Crafter to place everything how you want. You MUST place at least one hut, one water tank, and one food bowl in order to save and close out. Once done, you’re now free to do whatever you’d like. You will also unlock the Objective menu which you can access at any time with ZL. I’ll talk about it more in the next section.
As a side note, there is actually one final story part! The Epilogue. It never popped up for me properly, but you can read it through the Other Menu.
How the Main Menu Works
This may feel like it’s silly to go into more detail about the menu, but it can actually be a bit confusing and there is a reason you may want to pay attention to which Hamster you open the menu with.
Essentially, for certain traits that grant extra Hearts in minigames, you HAVE to open the menu with that specific Hamster. Otherwise, you will just get the regular score.
Similarly, it can be a little confusing as you need to pick the Menu for just… regular stuff where what Hamster you are picking really doesn’t matter. Because of that, I wanted to break down each bit of the Menu:
- Teach me, hamster! – This is where you can view your Hamster’s information. The type, their name, their gender, what traits they have (if any), plus who their parents are. This is also where you would send a Hamster to Hammy Alley by clicking X to “Return to Hamlet”.
- Food Forager – The first minigame. Requires you to place Sunflower seeds to lure your Hamster to the end. Whichever Hamster you opened the game with is the one who will be playing.
- Fluffle Kerfuffle – The second minigame. Requires you to pet the Hamster where the largest heart appears for each round. Whichever Hamster you opened the game with is the one who will be playing.
- Cage Creator – Where you can edit the look of your cage. This is where you place, move, and remove items.
- Hammy-ham Mall – Where you buy new items
- Matchmaking – Where you can breed Hamsters. You can either breed with NPCs or with a friend locally. It costs 500 Hearts per Matchmaking session or free when with friends. You will get one Hamster per Matchmaking session. Whichever Hamster you selected Matchmaking with is the one who will be selected for it.
- Hammy Alley – The Hamlet, essentially. This is where you can see any extra hamsters you have that can’t fit in the cage. Besides up to 8 being shown hanging out, you can also view their information (like when using Teach me, hamster!) and withdraw them back to the cage if you have space for them.
With that done, let’s go more into depth on how each part of the game works.
Objectives
Once you complete the tutorial, you unlock the “Objectives” section which can be accessed at any time by hitting ZL. You will unlock new items and a new card upon completing each one up until the 5th and final card. Each card has 12 Objectives on it for a total of 60. If you already completed an objective by the time the card unlocks, it will automatically be cleared. They apply retroactively.
If you’re curious what items are unlocked with each Card Clear, go to the Hammy-ham Mall section! The only Card that doesn’t unlock anything new is Objective Card 5.
Objective Card 1 – 100 FP per Objective Complete.
- Play the game at least once for one day.
- Have earned at least 1,000 Friendship Points.
- Clear Fluffle Kerfuffle on Easy. If this isn’t unlocking, try a different difficulty.
- Own at least two Huts.
- Feed your hamsters at least 3 times.
- Use Matchmaking at least 3 times.
- Play the game at least once for two different days.
- Own at least two Floorings (“Bedding”)
- Own at least two “Toy” items
- Spend at least 1,000 Friendship points at the Mall
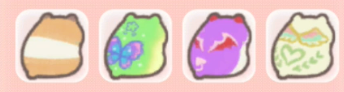
- Get at least one Candy Hamster (Details for each Hamster in the next section)
- Own at least 10 different items.
Objective Card 2 – 200 FP per Objective Complete.
- Have at least 5 Hamsters in Hamster Hamlet/Hamham Alley
- Feed your Hamsters at least 10 times
- Collect at least 2 Normal Hamster (the category Normal, not the specific color variant)
- Spend at least 3,000 Friendship points at the Mall
- See at least one Hamster Troupe Performance/Cutscene
- Have gotten at least 5 Male Hamsters from Matchmaking
- Own at least 3 Water Bottles/Tanks
- Own at least 10 Decoration items
- Have earned at least 5,000 Friendship Points
- Use Matchmaking at least 10 times
- Play the game at least once for three different days.
- Own at least 30 items
Objective Card 3 – 300 FP per Objective Complete.
- Have at least 2 Dessert hamsters
- Spent at least 5,000 FP at the mall
- Own at least 20 Decoration items
- Have gotten at least 5 Female Hamsters from Matchmaking
- Use Matchmaking at least 20 times
- Have at least 3 Candy Hamsters
- Own at least 30 Decoration items
- Have earned at least 10,000 FP.
- Own at least 10 Toys
- Play the game at least once for five different days.
- Have at least 3 Animal Hamsters
- See at least eight Hamster Troupe Performances/Cutscenes
Objective Card 4 – 400 FP per Objective Complete.
- Have played Fluffle Kerfluffle at least 30 times
- Have gotten at least 10 Male Hamsters from Matchmaking
- Have at least 3 Nature Hamsters
- Have at least 50 Decorations
- Have at least 5 Food Bowls
- Have at least 2 Tea Hamsters
- Have fed your hamsters at least 30 times
- Play the game at least once for seven different days.
- Use Matchmaking at least 30 times
- Have at least 3 Cat Hamsters
- Have at least 100 items
- Have earned at least 20,000 FP
Objective Card 5 – 500 FP per Objective Complete except for “All objectives completed” which gives you 2,000 for completing.
- Get at least one Rare Hamster
- Have gotten at least 20 Female Hamsters from Matchmaking
- Use Matchmaking at least 50 times
- Own at least one of every Decoration.
- Have played Fluffle Kerfuffle at least 50 times
- Have earned at least 30,000 FP
- Have at least 50 Hamsters in Hamster Hamlet/Hammy Alley
- Play the game at least once for 10 different days.
- Have at least 150 different items
- Have gotten at least one of each of the 8 different Normal Hamsters
- See every Hamster Troupe Performance/Cutscene
- Complete Every other Objective
Hamster Types, Performances, & Traits
Hamster Types
While you only get a choice between “Normal” variants when picking your very first Hamster, there are actually a total of 8 different Hamster categories making up 36 different Hamsters. The only way to get them is through Matchmaking. Matchmaking with a specific Hamster type does not guarantee you that hamster though. I’ll talk about this more in the Matchmaking section.
The listings are done from left to right. In the case of Normal Hamsters, it’s Left to right, top to bottom.
With the exception of the Normal Hamsters, every other Hamster has their own special trait that they can come with. I list these after each type. You can find more about the traits below this part.
Normal Hamsters:
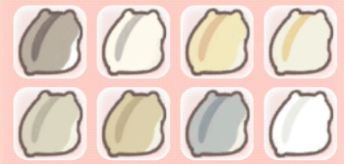
- Normal
- Pearl White
- Pudding
- Pudding Pearl
- Creamy Sapphire
- Sapphire Pudding
- Sapphire Blue
- Snow White
Animal Hamsters:

- Panda – Friendly
- Zebra – Unruly
- Turtle – Fluffy
- Tiger – Timid
Nature Hamsters:
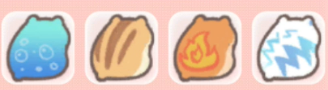
- Marine – Good Fortune
- Gaia – Gourmand
- Fire – Curious
- Thunder – Energetic
Tea Hamsters:
- Green Tea – Foodie
- Jasmine Tea – Needy
- Oolong Tea – Lucky Star
- Black Tea – Adventurous
Cat Hamsters:

- Scottish – Unruly
- Russian Blue – Lonely
- Bengal – Loves Pets
- Calico – Bargain Hunter
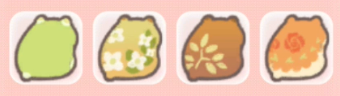
Dessert Hamsters:

- Strawberry – Positive
- Pancake – Bursting with Energy
- Fruit Punch – Sociable
- Chocolate – Excellent Fortune
Candy Hamsters:
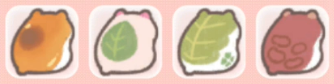
- Caramel – Anxious
- Cherry Blossom – Glutton
- Oak Leaf Rice Cake – Sluggish
- Red Bean Paste – Sensible Shopper
Rare Hamsters – These can currently only be gotten from matchmaking with friends.
- Super – Loves People
- Hyper – Gentleman
- Ultra – Lady
- Ultimate – Coupon Master
The Hamster Troupe Performances/Djungarian Group
As you collect different Hamster types and fill in your Illustrated Guide, upon getting all the colors required, a cutscene will be unlocked and immediately play of those Hamsters doing some kind of trick, performance, and/or dance. Below is a list of each one plus the Hamsters needed to unlock it:
- The Fluffle Shuffle – Normal, Cherry Blossom, Chocolate
- Djungarian Gymnastics – Pearl White, Fire, Black Tea, Strawberry
- The Hamster Blues – Pudding, Jasmine Tea, Caramel
- Djungarian Steppers – Pudding Pearl, Panda, Thunder, Bengal, Pancake
- Parlor Tricks – Creamy Sapphire, Chocolate
- The Hamster Haymaker – Sapphire Pudding, Russian Blue
- Fluff Aerobics – Sapphire Blue, Fruit Punch, Marine, Turtle
- I Love Sunflower Seeds – Snow White, Zebra, Green Tea, Oak leaf rice cake, Scottish
- Trick Shot – Calico, Oolong Tea
- Funny Faces – Red Bean Paste, Gaia, Tiger
- Balloon Tricks – Cherry Blossom, Chocolate, Russian Blue, Panda
- Roundy Roundy – Gaia, Pancake
- Snack Time! – Strawberry, Fruit Punch, Caramel, Cherry Blossom
- Flap, flap, flap – Fire, Thunder
- This World is Mine – Turtle, Green Tea, Calico
- Thank You! – Super, Hyper, Normal, Ultra, Ultimate
- Gimme! Gimme! Gimme! – Black Tea, Tiger, Oak leaf rice cake
- Ukulele – Scottish, Russian Blue, Bengal, Calico
You can watch all of the performances below:
Traits
Traits are given randomly during Matchmaking, though, certain types of Hamsters are more likely to give certain traits. Traits DO NOT stack. In the case of multiple of the same, only the highest one is picked. That said, some traits can work per Hamster for example, the Glutton trait which gives bonus Friendship Points every time you feed a Hamster will still work for every Hamster with that trait versus only once.
Traits generally have one of a few different categories:
- Care related – Traits that get you a bonus amount of FP for playing the game or feeding your Hamsters. These can stack per DIFFERENT Hamster (IE: If you had one hamster with 3 traits that gave you bonus FP for playing that day, it would only take the highest value trait they have into account. If you had a second hamster with one of those traits, both hamsters would each give the highest bonus amount from their trait list).
- Minigame related – Traits that give you more FP when playing a specific game. You MUST play the Minigame with the specific hamster that has the traits for them to apply.
- Mall related – Traits that give you a discount at the Mall. As long as they are in your cage, it is applied. It does not stack with multiple hamsters.
- Matchmaking related – Traits that give you certain boosts or guarantees during Matchmaking
Similarly, many traits can have multiple “grades” of the same type of trait. As mentioned though, they do not stack. If you have a Hamster that has both the middle and best discount traits, only the best one will be used.
Each Hamster can have up to 3 traits. It’s also possible they could have multiple of the same trait, but due to the fact that they do not overlap, it’s better to try for different ones.
There is no real organized list of Traits in the game so it’s entirely possible I could be missing some (please let me know if so), but I will be going in the same order as the Illustrated Guide using the first time any particular trait comes up and all variants of it together.
- Friendly – Gives you a bonus 50 FP the first time you bring up the game that day
- Sociable – Gives you a bonus 60 FP the first time you bring up the game that day
- Needy – Gives you a bonus 70 FP the first time you bring up the game that day
- Lonely – Gives you a bonus 80 FP the first time you bring up the game that day
- Loves People – Gives you a bonus 90 FP the first time you bring up the game that day
- Anxious – Gives you a bonus 10 FP every time you randomly get Friendship Points for just spending time watching your Hamsters in their Cage.
- Unruly – Gives you a bonus 15 FP every time you randomly get Friendship Points for just spending time watching your Hamsters in their Cage.
- Curious – Gives you a bonus 20 FP every time you randomly get Friendship Points for just spending time watching your Hamsters in their Cage.
- Adventurous – Gives you a bonus 25 FP every time you randomly get Friendship Points for just spending time watching your Hamsters in their Cage.
- Positive – Gives you a bonus 30 FP every time you randomly get Friendship Points for just spending time watching your Hamsters in their Cage.
- Loves Pets – Gives 1 extra attempt in Fluffle Kerfuffle. I’ll expand on this more in Minigames.
- Sluggish – Gives 2 extra attempts in Fluffle Kerfuffle.
- Fluffy – Gives 3 extra attempts in Fluffle Kerfuffle.
- Timid – Can give a bonus 100 FP when playing Fluffle Kerfuffle
- Energetic – Can give a bonus 200 FP when playing Fluffle Kerfuffle
- Bursting with Energy – Can give a bonus 300 FP when playing Fluffle Kerfuffle
- Good Fortune – Gives a 20% chance of creating a Rare Hamster when matchmaking with a friend
- Lucky Star – Gives a 30% chance of creating a Rare Hamster when matchmaking with a friend
- Excellent Fortune – Gives a 50% chance of creating a Rare Hamster when matchmaking with a friend
- Foodie – Gives a bonus 50 FP when feeding your Hamsters
- Gourmand – Gives a bonus 75 FP when feeding your Hamsters.
- Glutton – Gives a bonus 100 FP when feeding your Hamsters
- Sensible Shopper – Gives a 5% discount on all items at the Mall
- Bargain Hunter – Gives a 10% discount on all items at the Mall
- Coupon Master – Gives a 15% discount on all items at the Mall
- Gentleman – If you do Matchmaking with a Hamster with this trait, the offspring is guaranteed to be Male
- Lady – If you do Matchmaking with a Hamster with this trait, the offspring is guaranteed to be Female
Even if certain effects don’t stack, some can work really well together. For example, if you wanted to get as much FP just popping into the game each day and not really bothering with Minigames, getting the traits Loves People, Positive, and Glutton together would give quite a bit. Loves People gives you a bonus 90FP a day. If you have 8 Hamsters with that trait all in the cage, you’re getting 720 FP right away.
Then, Glutton makes it so you get a bonus 100FP when feeding your Hamsters. If all 8 hamsters in your cage have that, you can get 800 FP right when you feed them. You open the game, you feed your Hamsters, between the 720 before and 800 from feeding, you just got over 1,500 just from launching the game. Finally, Positive gives you 30FP for just hanging out with the game open. I haven’t calculated exactly how often it comes up, but again, if all 8 have that in your cage, that’s a bonus 240 getting you nearly 2,000FP just from the start.
Similarly, Bursting with Energy paired with Fluffy can earn you quite a bit more FP from Fluffle Kerfuffle.
Obviously those would likely require a lot of Matchmaking and luck, but it’s just an example of how you can kind of sync up different traits.
The Minigames
The game features two Minigames: Food Forager and Fluffle Kerfuffle. While the game really favors the latter between the amount needed for the Objectives completion, it being the only way you can pet your Hamsters, and it also having traits that can give you bonuses, I personally find Fluffle Kerfuffle a waste of time and not worth it beyond completing the objectives.
On Hard, even if you do Fluffle Kerfuffle perfectly, you will earn 250 FP at most, not accounting for extras given from traits. 200 for finishing on Hard and 50 for keeping your Retries intact. If you do have one of the Energetic-related traits, you can get 100-300 on top of that depending on which. Similarly, if you have one of the Retry-related traits, you can get up to 3 extra “Retries” added which if not used, is anywhere from an extra 50-150 as well so at most, you can earn 700 FP. Which does, in theory, sound good, except Fluffle Kerfuffle can take roughly a minute to play even when doing everything perfectly and not even counting the initial load-in just due to how long each round takes.
Meanwhile, I can finish Food Forager in about 7-12 seconds using only ~7 Sunflower Seeds on Average. You get 300 just from clearing it on Hard within the time limit and then 20 times however many seeds you have. If you have at least half, that’s at least 200 extra. So I can earn, on average, about 500 Points every time I play Food Forager which I can finish at least 6x faster. So, I could earn about 3,000 total FP in the time it’d take me to beat Fluffle Kerfuffle once. Even with the best traits to get you the most amount of FP by playing Fluffle Kerfuffle, on average I’ll still be earning over 2,000 FP more playing Food Forager.
Obviously, maybe Fluffle Kerfuffle is a lot easier for you and that’s fine! I’ll still be going over both in full, but I wanted to start out saying this as overall, I just find Food Forager to be better for earning Friendship Points.
If there’s one thing I will give Fluffle Kerfuffle though, it’s that it has one of the best songs in the game, despite making little sense for why that is the song for that game.
Food Forager
Food Forager is the first minigame in the menu. Essentially, you need to place Sunflower Seeds in order to lure your Hamster to the goal. While that seems simple enough, there are some challenges:
- There are other Hamsters on the map who may go after the Sunflower Seed you place if it’s in their line of sight.
- Obstacles can block the path.
- There is a limited amount of Sunflower Seeds.
- There is also a timer.
One nice thing though is you just need to go passed where the finish line is. You don’t have to actually cross it– as long as you go passed that area, it counts as finishing.
The game features 3 difficulties– Easy, Normal, and Hard. The difficulty changes how many other hamsters there are, how many obstacles, how many Sunflower Seeds you have at your disposal, how much time you have, and how much you get at the end.
Easy Mode:
- 30 Sunflower Seeds you can place
- 90 Seconds
- Only 1 Enemy Hamster
- 50 FP for clearing the game
- 5 FP per every Sunflower Seed you have left
Normal Mode:
- 25 Sunflower Seeds you can place
- 75 Seconds
- 2 Enemy Hamsters
- 125 FP for Clearing
- 10 FP per every Sunflower Seed you have left
Hard Mode:
- 20 Sunflower Seeds you can place
- 50 Seconds
- 3 Enemy Hamsters
- 300 FP for Clearing
- 20 FP per every Sunflower you have left
The course is always the same length.
You can place Sunflowers pretty much constantly. Generally you want it within 2-3 Hamster Lengths for your Hamster to notice it. It also has to be in their line of sight to an extent. If an Enemy Hamster turns around, even if they are right next to it, they won’t see a Sunflower Seed.
Fluffle Kerfuffle (also known sometimes as Fluffle Kerfluffle)
Fluffle Kerfuffle is the petting minigame. Essentially, you need to find the biggest Heart and then just rotate the right stick around to pet them there (or if you’re using a Switch Lite or playing the game in handheld mode, you can actually pet with your finger on the touch screen).
The game features 5 different difficulties which effect the amount of FP you get, how many hearts there are at a time, and some other adjustments to the hearts on harder levels. Regardless of difficulty, the game always has 5 Total Rounds, a 10 second timer per round, and only 1 Retry, unless the Hamster you are playing with has a trait that gives you more.
Easy:
- 5 Stationery Hearts you need to find the Biggest Heart among
- 50 FP for clearing the game
- 5 FP per retry left.
Normal:
- 6 Stationery Hearts you need to find the Biggest Heart among
- 75 FP for clearing the game
- 10 FP per retry left.
Hard:
- 6 spinning Hearts you need to find the Biggest Heart among
- 100 FP for clearing the game
- 20 FP per retry left.
Super Hard:
- 7 spinning Hearts you need to find the Biggest Heart among
- 150 FP for clearing the game
- 30 FP per retry left.
Hamster Master:
- 7 spinning Hearts you need to find the Biggest Heart among
- The hearts are closer in size
- 200 FP for clearing the game
- 50 FP per retry left.
If you have the traits: Timid, Energetic, or Bursting with Energy, you can get a bonus 100, 200, or 300 FP respectively upon finishing a round of the game. Similarly, the traits Loves Pets, Sluggish, or Fluffy can give you 1, 2, or 3 extra retries in the game which if you end up not using any, can give you a bonus amount of FP per retry left as well.
Items
Hammy-ham Mall is where you can purchase every single item you unlock. You can buy as many items as you’d like for your Cage, but keep in mind that Hamsters need at least a 2×2 space in front of an item to be able to properly interact with it. Similarly, if you have too many items in your cage and not enough empty space, you won’t be able to have as many hamsters at a time. That said, you are more than welcomed to have just one Hamster you spoil with as many things as you can– the only real con for having less is you’ll get less Friendship Points upon loading up the game, feeding, and watching your Hamster(s) and honestly, earning FP isn’t too bad.
While you have a good amount of items from the start, more items will unlock as you complete Objective Cards so it’s worth doing your best to clear those out.
One unfortunately annoying thing is the placement can be rather “slippery”– it can take a lot to get something exactly where you want. I find using the D-Pad helps give a little more control, but it’s an issue even just scrolling through the shop as well. I also recommend scrolling all the way to the bottom from the left side when a section has a scroll bar. The game will not automatically move your cursor to where an item is so if you try to scroll where there is no item below the item you’re on, it actually won’t scroll down any further.
There are NO limits on how much you can place of anything EXCEPT for the Flooring/Bedding– you can only place 1. But everything else you can place as many as you’d like as long as you have room. There is no maximum to how much you buy either.
Just remember you must have at least one Hut, one Water Bottle, and one Food Bowl at minimum in your cage. It can be any of those types of items so you don’t have to keep the default, but you do need to make sure you have some!
Below is a table that contains every item in the game, how to unlock them, and all the other information you may need to plan out your Hamster Cage and decide what you may want to buy. To help keep track, items are listed in order of how they will be after being unlocked versus Unlock Order. DLC items are also included.
Note: Prices are the original prices without any Traits that may give a discount. I will have a list at the bottom with how much prices can be discounted based off which trait you have.
| Item Name | Category | Price | Size | Unlocks: |
|---|---|---|---|---|
| Desert Rock | Huts | 0 | 8x8 | At the Start |
| Yellow Desert Rock | Huts | 100 | 8x8 | After Tutorial |
| Red Desert Rock | Huts | 100 | 8x8 | After Tutorial |
| Fairytale Hut | Huts | 300 | 8x8 | After Tutorial |
| Japanese Hut | Huts | 300 | 8x8 | After clearing Objective Card 1 |
| Western Hut | Huts | 300 | 8x8 | After clearing Objective Card 1 |
| Wooden Hut | Huts | 300 | 8x8 | After clearing Objective Card 1 |
| Rusty Hut | Huts | 300 | 8x8 | After clearing Objective Card 1 |
| Candy Hut | Huts | 400 | 8x8 | After clearing Objective Card 2 |
| Straw Hut | Huts | 400 | 8x8 | After clearing Objective Card 2 |
| Witch's Hut | Huts | 400 | 8x8 | After clearing Objective Card 2 |
| Forest Mushroom | Huts | 400 | 8x8 | After clearing Objective Card 2 |
| Pink Mushroom | Huts | 400 | 8x8 | After clearing Objective Card 3 |
| Blue Mushroom | Huts | 400 | 8x8 | After clearing Objective Card 3 |
| Ruins | Huts | 400 | 8x8 | After clearing Objective Card 3 |
| Flower Hut | Huts | 500 | 8x8 | After clearing Objective Card 3 |
| Ice Hut | Huts | 500 | 8x8 | After clearing Objective Card 4 |
| See-through Hut | Huts | 500 | 8x8 | After clearing Objective Card 4 |
| Asian Hut | Huts | 500 | 8x8 | After clearing Objective Card 4 |
| Funghi's Den | Huts | 500 | 8x8 | After Tutorial |
| Sunflower seed house | Huts | 0 | 8x8 | With the Sukeroku Pack DLC |
| Cottage | Huts | 0 | 8x8 | With the Desert island in summer DLC |
| Lodge | Huts | 0 | 8x8 | With the Autumn Landscape Pack DLC |
| Water Bottle | Water | 0 | 2x2 | At the Start |
| Pink Water Bottle | Water | 100 | 2x2 | After Tutorial |
| Blue Water Bottle | Water | 100 | 2x2 | After Tutorial |
| Barrel | Water | 100 | 2x2 | After Tutorial |
| Pink Barrel | Water | 100 | 2x2 | After Tutorial |
| Blue Barrel | Water | 100 | 2x2 | After Tutorial |
| Black Cat | Water | 200 | 2x2 | After Tutorial |
| Grey Cat | Water | 200 | 2x2 | After clearing Objective Card 1 |
| White Cat | Water | 200 | 2x2 | After clearing Objective Card 1 |
| Coconut | Water | 200 | 2x2 | After clearing Objective Card 1 |
| Nearly Ripe Coconut | Water | 200 | 2x2 | After clearing Objective Card 1 |
| Ripe Coconut | Water | 200 | 2x2 | After clearing Objective Card 1 |
| Honeypot | Water | 200 | 2x2 | After clearing Objective Card 1 |
| Red Honeypot | Water | 200 | 2x2 | After clearing Objective Card 2 |
| Blue Honeypot | Water | 200 | 2x2 | After clearing Objective Card 2 |
| Water Pump | Water | 200 | 2x2 | After clearing Objective Card 2 |
| Red Water Pump | Water | 200 | 2x2 | After clearing Objective Card 2 |
| Blue Water Pump | Water | 200 | 2x2 | After clearing Objective Card 2 |
| Owl | Water | 300 | 2x2 | After clearing Objective Card 2 |
| White Owl | Water | 300 | 2x2 | After clearing Objective Card 3 |
| Blue Owl | Water | 300 | 2x2 | After clearing Objective Card 3 |
| Rockhopper Penguin | Water | 300 | 2x2 | After clearing Objective Card 3 |
| Pink Penguin | Water | 300 | 2x2 | After clearing Objective Card 3 |
| Blue Penguin | Water | 300 | 2x2 | After clearing Objective Card 3 |
| Pudding | Water | 400 | 2x2 | After clearing Objective Card 4 |
| Strawberry Pudding | Water | 400 | 2x2 | After clearing Objective Card 4 |
| Chocolate Pudding | Water | 400 | 2x2 | After clearing Objective Card 4 |
| Pumpkin | Water | 400 | 2x2 | After clearing Objective Card 4 |
| Rocket | Water | 500 | 2x2 | After clearing Objective Card 4 |
| Sunflower Watering can | Water | 0 | 2x2 | With the Sukeroku Pack DLC |
| Regular Food Bowl | Meals | 0 | 2x2 * | At the Start |
| Pink Food Bowl | Meals | 100 | 2x2 | After Tutorial |
| Blue Food Bowl | Meals | 100 | 2x2 | After Tutorial |
| Tree Stump | Meals | 100 | 2x2 | After Tutorial |
| Pink Tree Stump | Meals | 100 | 2x2 | After Tutorial |
| Blue Tree Stump | Meals | 100 | 2x2 | After clearing Objective Card 1 |
| Candy Food Bowl | Meals | 200 | 2x2 | After clearing Objective Card 1 |
| Pink Candy Food Bowl | Meals | 200 | 2x2 | After clearing Objective Card 1 |
| Chocolate Candy Food Bowl | Meals | 200 | 2x2 | After clearing Objective Card 1 |
| Apple Food Bowl | Meals | 200 | 2x2 | After clearing Objective Card 2 |
| Green Apple Food Bowl | Meals | 200 | 2x2 | After clearing Objective Card 2 |
| Golden Apple Food Bowl | Meals | 200 | 2x2 | After clearing Objective Card 2 |
| Strainer | Meals | 300 | 2x2 | After clearing Objective Card 2 |
| Porcelain | Meals | 300 | 2x2 | After clearing Objective Card 3 |
| Witch's Food Bowl | Meals | 300 | 2x2 | After clearing Objective Card 3 |
| Stone Food Bowl | Meals | 300 | 2x2 | After clearing Objective Card 3 |
| Wok | Meals | 300 | 2x2 | After clearing Objective Card 3 |
| Pot | Meals | 400 | 2x2 | After clearing Objective Card 4 |
| Wooden Bowl | Meals | 400 | 2x2 | After clearing Objective Card 4 |
| Tin Food Bowl | Meals | 400 | 2x2 | After clearing Objective Card 4 |
| Food Bowl with sunflower | Meals | 0 | 2x2 | With the Sukeroku Pack DLC |
| Grassy Field | Flooring | 200 | N/A | After Tutorial |
| Confectionary | Flooring | 200 | N/A | After Tutorial |
| The Countryside | Flooring | 200 | N/A | After Tutorial |
| Halloween | Flooring | 200 | N/A | After Tutorial |
| Machine | Flooring | 300 | N/A | After clearing Objective Card 1 |
| Sawdust | Flooring | 200 | N/A | At the Start |
| Forest | Flooring | 300 | N/A | After clearing Objective Card 1 |
| Cherry Blossom | Flooring | 300 | N/A | After clearing Objective Card 1 |
| Summoning Circle | Flooring | 400 | N/A | After clearing Objective Card 2 |
| Flower Garden | Flooring | 400 | N/A | After clearing Objective Card 2 |
| Sunflower | Flooring | 400 | N/A | After clearing Objective Card 2 |
| The Moon | Flooring | 500 | N/A | After clearing Objective Card 3 |
| Snow | Flooring | 500 | N/A | After clearing Objective Card 3 |
| Crop Circle | Flooring | 500 | N/A | After clearing Objective Card 3 |
| Puzzle | Flooring | 500 | N/A | After clearing Objective Card 4 |
| Earth | Flooring | 500 | N/A | After clearing Objective Card 4 |
| Stone Paving | Flooring | 500 | N/A | After clearing Objective Card 4 |
| Brown Sunflower Floor | Flooring | 0 | N/A | With the Sukeroku Pack DLC |
| Green Sunflower Floor | Flooring | 0 | N/A | With the Sukeroku Pack DLC |
| Maple | Flooring | 0 | N/A | With the Autumn Landscape Pack DLC |
| No Man's Land | Flooring | 0 | N/A | With the Desert island in summer DLC |
| Regular Hamster Wheel | Toys | 200 | 4x2 | During Cage Tutorial |
| Red Hamster Wheel | Toys | 200 | 4x2 | After Tutorial |
| Blue Hamster Wheel | Toys | 200 | 4x2 | After Tutorial |
| Water Wheel | Toys | 200 | 4x2 | After Tutorial |
| Windmill | Toys | 400 | 4x2 | After clearing Objective Card 4 |
| Candy Hamster Wheel | Toys | 400 | 4x2 | After clearing Objective Card 4 |
| Witch's Hamster Wheel | Toys | 400 | 4x2 | After clearing Objective Card 4 |
| Flying Saucer | Toys | 200 | 4x4 | After clearing Objective Card 1 |
| Sunflower Hamster Wheel | Toys | 0 | 4x2 | With the Sukeroku Pack DLC |
| Sunflower Slide | Toys | 0 | 6x6 * | With the Sukeroku Pack DLC |
| Red Flying Saucer | Toys | 200 | 4x4 | After clearing Objective Card 1 |
| Wooden Flying Saucer | Toys | 200 | 4x4 | After clearing Objective Card 1 |
| Slide | Toys | 300 | 6x6 | After clearing Objective Card 2 |
| Red Slide | Toys | 300 | 6x6 | After clearing Objective Card 2 |
| Wooden Slide | Toys | 300 | 6x6 | After clearing Objective Card 2 |
| Seesaw | Toys | 300 | 8x2 | After clearing Objective Card 3 |
| Red Seesaw | Toys | 300 | 8x2 | After clearing Objective Card 3 |
| Blue Seesaw | Toys | 300 | 8x2 | After clearing Objective Card 3 |
| Wooden Seesaw | Toys | 300 | 8x2 | After clearing Objective Card 3 |
| Candy | Room Decorations | 0 | 2x2 | At the Start |
| Cake | Room Decorations | 100 | 2x2 | After Tutorial |
| Cupcake | Room Decorations | 100 | 2x2 | After Tutorial |
| Chocolate Cupcake | Room Decorations | 100 | 2x2 | After Tutorial |
| Strawberry Cupcake | Room Decorations | 100 | 2x2 | After Tutorial |
| Cream Cupcake | Room Decorations | 100 | 2x2 | After Tutorial |
| Donut | Room Decorations | 100 | 2x2 | After Tutorial |
| Heart Donut | Room Decorations | 100 | 2x2 | After Tutorial |
| Bucket | Room Decorations | 100 | 1x1 | After Tutorial |
| Flowerpot | Room Decorations | 100 | 1x1 | After Tutorial |
| Flowerpot with Stand | Room Decorations | 200 | 1x1 | After Tutorial |
| Long Flowerpot | Room Decorations | 200 | 2x1 | After Tutorial |
| Mailbox | Room Decorations | 100 | 1x1 | After Tutorial |
| Cat | Room Decorations | 200 | 2x1 | After Tutorial |
| Wooden Box | Room Decorations | 100 | 2x2 | After Tutorial |
| Big Wooden Box | Room Decorations | 200 | 4x4 | After Tutorial |
| Hose | Room Decorations | 200 | 2x2 | After Tutorial |
| Bottle | Room Decorations | 200 | 2x2 | After clearing Objective Card 1 |
| Round Flower Bed | Room Decorations | 200 | 4x4 | After clearing Objective Card 1 |
| Square Flower Bed | Room Decorations | 200 | 4x4 | After clearing Objective Card 1 |
| Tower | Room Decorations | 200 | 4x4 | After clearing Objective Card 1 |
| Scarecrow | Room Decorations | 200 | 4x4 | After clearing Objective Card 1 |
| Farm Tools | Room Decorations | 200 | 4x4 | After clearing Objective Card 1 |
| Candle | Room Decorations | 200 | 2x2 | After clearing Objective Card 1 |
| Witch's Cauldron | Room Decorations | 200 | 2x2 | After clearing Objective Card 1 |
| Ghost | Room Decorations | 200 | 2x2 | After clearing Objective Card 1 |
| Pumpkin | Room Decorations | 200 | 2x2 | After clearing Objective Card 1 |
| Pumpkin Seeds | Room Decorations | 200 | 2x2 | After clearing Objective Card 1 |
| Moon | Room Decorations | 200 | 4x2 | After clearing Objective Card 1 |
| Witch's Tree 1 | Room Decorations | 200 | 4x4 | After clearing Objective Card 1 |
| Witch's Tree 2 | Room Decorations | 200 | 4x4 | After clearing Objective Card 1 |
| Witch's Tree 3 | Room Decorations | 200 | 4x4 | After clearing Objective Card 1 |
| Video Game Console | Room Decorations | 300 | 1x1 | After clearing Objective Card 1 |
| Arcade Machine | Room Decorations | 300 | 1x1 | After clearing Objective Card 1 |
| Green Leaves | Room Decorations | 100 | 1x1 | After clearing Objective Card 2 |
| Yellow Leaves | Room Decorations | 100 | 1x1 | After clearing Objective Card 2 |
| Maple Leaves | Room Decorations | 100 | 1x1 | After clearing Objective Card 2 |
| Wooden Mini Table | Room Decorations | 200 | 1x1 | After clearing Objective Card 2 |
| Pink Mini Table | Room Decorations | 200 | 1x1 | After clearing Objective Card 2 |
| Blue Mini Table | Room Decorations | 200 | 1x1 | After clearing Objective Card 2 |
| Green Mini Table | Room Decorations | 200 | 1x1 | After clearing Objective Card 2 |
| Old Watch | Room Decorations | 300 | 1x1 | After clearing Objective Card 2 |
| Toilet | Room Decorations | 300 | 2x2 | After clearing Objective Card 2 |
| Wooden Bench | Room Decorations | 200 | 2x1 | After clearing Objective Card 2 |
| Stone Bench | Room Decorations | 200 | 2x1 | After clearing Objective Card 2 |
| Red Bench | Room Decorations | 200 | 2x1 | After clearing Objective Card 2 |
| Red Sofa | Room Decorations | 300 | 4x2 | After clearing Objective Card 2 |
| Black Sofa | Room Decorations | 300 | 4x2 | After clearing Objective Card 2 |
| Blue Sofa | Room Decorations | 300 | 4x2 | After clearing Objective Card 2 |
| Pink Sofa | Room Decorations | 300 | 4x2 | After clearing Objective Card 2 |
| White Sofa | Room Decorations | 300 | 4x2 | After clearing Objective Card 2 |
| Street Lamp | Room Decorations | 200 | 1x1 | After clearing Objective Card 3 |
| Sushi | Room Decorations | 200 | 4x2 | After clearing Objective Card 3 |
| Ramen | Room Decorations | 200 | 4x2 | After clearing Objective Card 3 |
| Pizza | Room Decorations | 200 | 4x2 | After clearing Objective Card 3 |
| Cake | Room Decorations | 200 | 4x2 | After clearing Objective Card 3 |
| Curry | Room Decorations | 200 | 4x2 | After clearing Objective Card 3 |
| Television | Room Decorations | 300 | 2x1 | After clearing Objective Card 3 |
| Well | Room Decorations | 200 | 2x2 | After clearing Objective Card 3 |
| Professor Duck | Room Decorations | 300 | 2x2 | After clearing Objective Card 3 |
| Miss Polly | Room Decorations | 300 | 2x2 | After clearing Objective Card 3 |
| Hamsterman | Room Decorations | 300 | 2x2 | After clearing Objective Card 3 |
| Lianne | Room Decorations | 300 | 2x2 | After clearing Objective Card 3 |
| Small Bush | Room Decorations | 100 | 2x2 | After clearing Objective Card 3 |
| Large Bush | Room Decorations | 200 | 2x2 | After clearing Objective Card 3 |
| Small Bamboo | Room Decorations | 100 | 3x3 | After clearing Objective Card 3 |
| Big Bamboo | Room Decorations | 200 | 4x3 | After clearing Objective Card 4 |
| Small Mushroom | Room Decorations | 100 | 2x2 | After clearing Objective Card 4 |
| Big Mushroom | Room Decorations | 200 | 3x3 | After clearing Objective Card 4 |
| Christmas Cake | Room Decorations | 100 | 2x2 | After clearing Objective Card 4 |
| Present | Room Decorations | 100 | 2x2 | After clearing Objective Card 4 |
| Big Snowman | Room Decorations | 200 | 2x2 | After clearing Objective Card 4 |
| Small Snowman | Room Decorations | 100 | 2x2 | After clearing Objective Card 4 |
| Daruma | Room Decorations | 200 | 2x2 | After clearing Objective Card 4 |
| Gold Coin | Room Decorations | 200 | 2x2 | After clearing Objective Card 4 |
| Pine Ornament | Room Decorations | 200 | 2x2 | After clearing Objective Card 4 |
| Torii Gate | Room Decorations | 200 | 2x2 | After clearing Objective Card 4 |
| New Year's Mochi | Room Decorations | 200 | 2x2 | After clearing Objective Card 4 |
| Lucky Bag | Room Decorations | 200 | 2x2 | After clearing Objective Card 4 |
| Cactus | Room Decorations | 200 | 2x2 | After clearing Objective Card 4 |
| Small Cactus | Room Decorations | 100 | 2x2 | After clearing Objective Card 4 |
| Grass | Room Decorations | 100 | 2x2 | After clearing Objective Card 4 |
| Rock | Room Decorations | 100 | 3x2 | After clearing Objective Card 4 |
| Pink Bear | Room Decorations | 0 | 1x1 | With code from the Physical Edition |
| Blue Bear | Room Decorations | 300 | 1x1 | After Tutorial |
| White Bear | Room Decorations | 300 | 1x1 | After clearing Objective Card 1 |
| Brown Bear | Room Decorations | 300 | 1x1 | After clearing Objective Card 2 |
| Black Bear | Room Decorations | 300 | 1x1 | After clearing Objective Card 3 |
| Nameko Mushroom Hut | Room Decorations | 500 | 4x2 | After Tutorial |
| Nice to meet you. | Room Decorations | 0 | 2x2 | With the Sukeroku Pack DLC |
| Let's take it easy. | Room Decorations | 0 | 2x2 | With the Sukeroku Pack DLC |
| Under construction. | Room Decorations | 0 | 2x2 | With the Sukeroku Pack DLC |
| It's delicious! | Room Decorations | 0 | 2x2 | With the Sukeroku Pack DLC |
| I've come to play with you. | Room Decorations | 0 | 2x2 | With the Sukeroku Pack DLC |
| I can't stop! | Room Decorations | 0 | 2x2 | With the Sukeroku Pack DLC |
| Ms.Peach | Room Decorations | 0 | 2x2 | With the Sukeroku Pack DLC |
| Mr.Garia | Room Decorations | 0 | 2x2 | With the Sukeroku Pack DLC |
| Mr.Djan | Room Decorations | 0 | 2x2 | With the Sukeroku Pack DLC |
| Ms. Fairy | Room Decorations | 500 | 2x2 | After clearing Objective Card 4 |
| Mr.Yashichi | Room Decorations | 0 | 2x2 | With the Sukeroku Pack DLC |
| Mr.Jinpachi | Room Decorations | 0 | 2x2 | With the Sukeroku Pack DLC |
| Dinner for all! | Room Decorations | 0 | 4x4 | With the Sukeroku Pack DLC |
| Royal dresser | Room Decorations | 0 | 2x2 | With the Spring Festival Pack DLC |
| Royal table | Room Decorations | 0 | 3x3 | With the Spring Festival Pack DLC |
| Royal single sofa | Room Decorations | 0 | 3x2 | With the Spring Festival Pack DLC |
| Royal double sofa | Room Decorations | 0 | 4x2 | With the Spring Festival Pack DLC |
| Cherry Blossom | Room Decorations | 0 | 5x4 | With the Spring Festival Pack DLC |
| Carp streamer | Room Decorations | 0 | 4x2 | With the Spring Festival Pack DLC |
| Girls' Festival | Room Decorations | 0 | 6x6 | With the Spring Festival Pack DLC |
| Dragonfly | Room Decorations | 0 | 1x1 | With the Autumn Landscape Pack DLC |
| Maple tree | Room Decorations | 0 | 5x4 | With the Autumn Landscape Pack DLC |
| Persimmon | Room Decorations | 0 | 4x3 | With the Autumn Landscape Pack DLC |
| Bell crickets | Room Decorations | 0 | 2x2 | With the Autumn Landscape Pack DLC |
| Shaved ice | Room Decorations | 0 | 2x2 | With the Desert island in summer DLC |
| Palm tree | Room Decorations | 0 | 5x4 | With the Desert island in summer DLC |
| Sunburn goods | Room Decorations | 0 | 3x3 | With the Desert island in summer DLC |
| Sea turtle | Room Decorations | 0 | 4x4 | With the Desert island in summer DLC |
* All the Bowls are listed as 4×4 in the Mall, but they are actually 2×2 like the Water Bottles. The Sunflower Slide had a similar issue listed as the same size as the Wheel, but it’s 6×6 like all the other Slides.
If you happen to have a Hamster with one of the following traits: Sensible Shopper, Bargain Hunter or Coupon Master, you will actually get a 5%, 10%, or 15% discount respectively based off which you have. The highest will automatically be picked. These are how much each item can be discounted, listed from cheapest to most expensive:
| Original Price | Sensible Shopper (5% Discount) | Bargain Hunter (10% Discount) | Coupon Master (15% Discount) |
|---|---|---|---|
| 100 | 95 | 90 | 85 |
| 200 | 190 | 180 | 170 |
| 300 | 285 | 270 | 255 |
| 400 | 380 | 360 | 340 |
| 500 | 475 | 450 | 425 |
Matchmaking
Matchmaking is essentially the only way to get more Hamsters and involves breeding your Hamster with an NPC or a friend through Local Wireless Play.
Whichever Hamster you specifically want to use for Matchmaking is the one you should open the Menu for. Once in, your Hamster’s name, gender, and type will be listed along with any traits your Hamster may have
You have the ability to Lock ONE Trait with X. Locking a Trait will guarantee that whatever Hamster is bred will have that trait. There is still a chance the other Traits could carry over as well though.
Once you’ve locked a trait, if you chose to, it’s just deciding if you would like to breed with an NPC or with a friend Locally. If you decide to breed with an NPC, you press A for “Single Player”. You will then get a Matchmaking Prediction of 3 different Breeds that could show up– they could be ANY of the Hamster Colors/Variations/Types except for the Four Rare Colors.
If you aren’t happy with any of the 3 predicted, you can back out by pressing B and re-enter for the list of three to be randomized again. While the chance is higher for you to get a color matching a parent, it’s not actually a 50-50 chance at all. In fact, you can get other Hamsters of similar types or colors even if that type is not shared by a Parent. While I’d still recommend trying to still get a list with the type you want, it’s definitely not required and you could get lucky regardless.
Once you have a Matchmaking Prediction list you’re happy with, go ahead and press A. It will take 500 Friendship Points for your Hamster to head to the Matchmaking Tree. There is no way to pick which of the three your Hamster will match up with so you can’t narrow it down further. The Hamsters will always hit it off and after a short cutscene, a new Hamster will arrive, fully grown and ready to go. If you have 8 Hamsters already in your cage OR your cage is too full, it will automatically go to Hamham Alley.
If you decide to breed with Friends, you can press Y. Discuss with your friend ahead of time who will Search and who will Wait. I’d recommend having the person who plans to “Wait” go through first as it can be a bit glitchy searching otherwise even though there is an option to Search again. Matchmaking with a friend is free so it’s a great way to help one another.
Unfortunately, matchmaking with a friend is Local ONLY. This is pretty disheartening, especially as you need to get all the Rare Hamsters for completion. You also need to have a Hamster with one of the Rare Breeding Traits (Good Fortune (20%), Lucky Star (30%), or Excellent Fortune (50%)) in order to try for one of the Rare Hamster colors. You and your friend are NOT guaranteed to get the same Hamster from breeding together– you could get two different ones and even just one of you could get a rare (or you could both get two different rares). But since it’s free, there’s no reason not to keep trying.
There is occasionally a glitch when breeding with a friend will not actually load the cutscene of them meeting properly for one of you. It doesn’t cause any problems– you can just back out, but whoever has the issue will not get a new Hamster. You could matchmake again just fine though.
You will get pretty familiar with Matchmaking regardless of which option though as like I said, it’s the only way to get more Hamsters and is probably one of the places you’ll spend the most time.
DLC
The game actually has extra DLC you can get. It’s unknown if there will be more in the future besides these, but if you’re hoping for more game content, there’s at least a bit more! DLC items do not cost any Friendship Points in the Mall– they’re completely free so you can buy as many as you want.
The first DLC is something exclusive to the Physical version of the Game: a Pink Bear. It looks just like the other Bears you can have in the Room Decorations section of the Mall– it’s just Pink.
Second, the Sukeroku Pack. A code for it was included in the Physical version so you could have it at release, but the DLC Packreleased on the eShop on June 24th for $5.
Third is the Desert Island in Summer Pack! It released July 22nd and costs $3 on the eShop.
Fourth is the Autumn Landscape Pack! It released October 14th and costs $3 on the eShop.
Fifth is the Spring Festival Pack. It released March 3rd, 2022 and costs $3 on the eShop. That said, there is currently an issue and it is NOT showing up on the North American eShop. You would need to buy it in a different region eShop to get it.
The Sukeroku Pack contains a slew of new items all designed by GOTTE who illustrated the Opening Screen and Story Artwork. It includes the following:
- Sunflower seed house
- Sunflower watering can
- Food Bowl with sunflower
- Brown Sunflower Floor
- Green Sunflower Floor
- Sunflower Hamster Wheel
- Sunflower Slide
- 12 Hamster items in Decorations, similar to Ms. Fairy’s Room Decoration Item, including:
- 6 different Sukeroku:
- Nice to meet you.
- Let’s take it easy.
- Under construction.
- It’s delicious!
- I can’t stop!
- Ms.Peach
- Mr.Garia
- Mr.Djan
- Mr.Yashichi
- Mr.Jinpachi
- Dinner for all!
- 6 different Sukeroku:
None of these are required for completion, of course, but are still really cute. I am a bit sad some of those hamsters aren’t actual new Hamsters though…
Meanwhile, the Desert Island in Summer pack has:
- Cottage Hut
- No Man’s Land Flooring
- 4 Decoration items:
- Shaved ice
- Palm tree
- Sunburn goods
- Sea turtle
The Autumn Landscape pack has:
- Lodge
- Maple
- 4 Decoration items:
- Dragonfly
- Maple tree
- Persimmon
- Bell crickets
The Spring Festival pack has 7 decoration items:
- Royal dresser
- Royal table
- Royal single sofa
- Royal double sofa
- Cherry Blossom
- Carp streamer
- Girls’ Festival